[Android] LifecycleScope의 종류

image.png

1. Activity의 lifecycleScope

  • Activity나 Fragment의 전체 생명주기를 따름
  • Lifecycle.State.DESTROYED가 되면 자동으로 코루틴 취소

따라서 아래 코드는 “3datastore=PATTERN” 로그만 찍힌다.

1
2
3
4
5
6
7
8
9
10
11
12
13
14
15
16
17
18
19
20
21
22
23
override fun onDestroy() {
DEBUG.d("leejs - onDestroy")

// 실행 안됨: Destroy를 호출하기 전에 실행
lifecycleScope.launch {
DEBUG.d("leejs - 1datastore=${viewModel.getLockMethod()}")
}

super.onDestroy()

// 실행 안 됨: Destroy된 상태기 때문.
lifecycleScope.launch {
DEBUG.d("leejs - 2datastore=${viewModel.getLockMethod()}")
}
// 실행됨: lifecycle과 관련 없는 코루틴에서 실행.
CoroutineScope(Dispatchers.Main).launch {
DEBUG.d("leejs - 3datastore=${viewModel.getLockMethod()}")
}
}

// 결과 //
// leejs - onDestroy
// leejs - 3datastore=PATTERN

2. Fragment의 viewLifecycleOwner.lifecycleScope

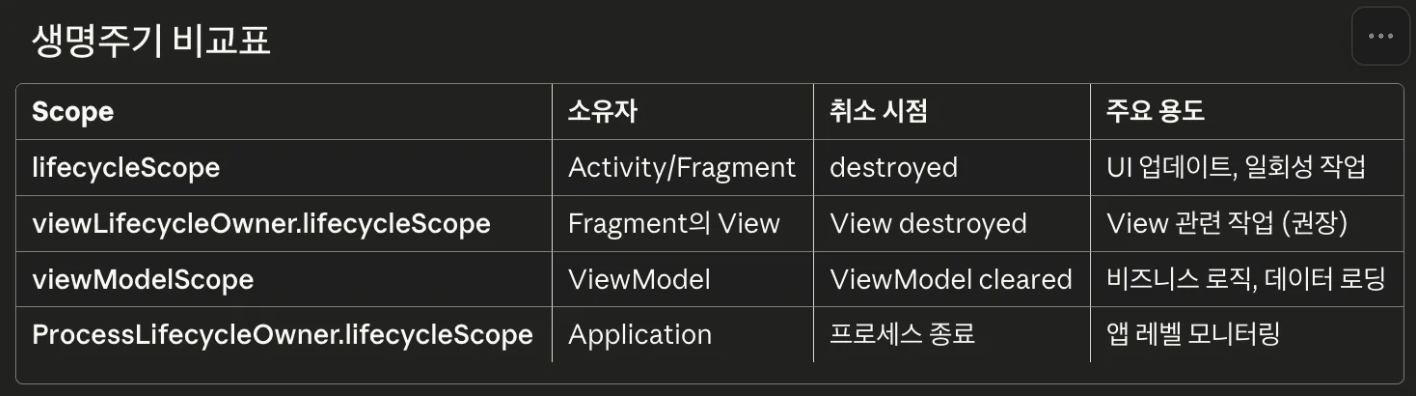
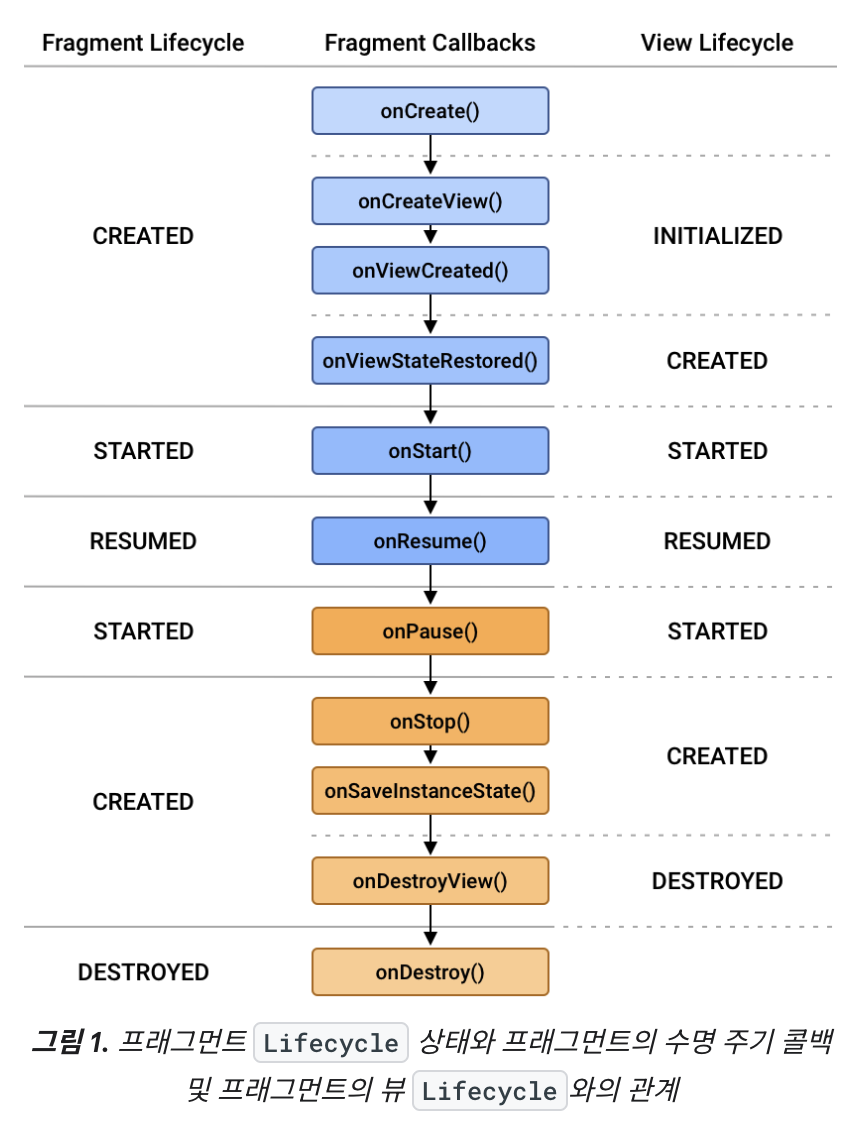
Fragment는 백스택에 있을 때 onDestroyView()가 호출되지만 Fragment 자체는 살아있는 상태다. 따라서 Fragment에서 lifecycleScope를 쓰게 되는 경우 메모리 누수가 발생할 수 있다. 이때 사용하는 게 viewLifecycleOwner.lifecycleScope이며, onViewCreated(뷰가 생성완료 되었을 때)에서 launch한다.

1
2
3
4
5
6
7
8
class TestFragment : Fragment() {
override onViewCreated(...) {
viewLifecycleOwner.lifecycleScope.launch {
// Fragment의 lifecycle을 따르는 (Fragment의 onCreate에서 호출하는) lifecycleScope.launch와는 다르게,
// Fragment의 View의 lifecycle을 따르기 때문에 "Fragment가 DESTROYED되기 전, 그리고 Fragment의 View가 DESTROYED된 후"의 메모리 누수를 방지할 수 있다.
}
}
}

3. ViewModel의 viewModelScope

  • ViewModel이 clear될 때만 취소됨
  • Dispatchers.Main.immediate 사용
1
2
3
4
5
6
7
class TestViewModel : ViewModel() {
init {
viewModelScope.launch {
// 해당 ViewModel의 lifecycle을 따르기 때문에 viewModel이 살아있는 동안에만(Cleared되기 전까지) 여기의 코루틴을 실행하도록 해준다.
}
}
}

4. 앱의 ProcessLifecycleOwner.get().lifecycleScope

  • Application 레벨의 lifecycle을 따르며, 앱 프로세스가 종료될 때 취소된다.
  • 앱 전체의 포그라운드/백그라운드 상태를 감지할 수 있다.
  • 앱 레벨 데이터 동기화에 사용한다.

사용처

  • Application을 상속받는 클래스 또는 위젯 관련 로직에서 사용한다.

[Android] lifecycleScope vs viewLifecycleOwner.lifecycleScope

Lifecycle

Fragment의 Lifecycle

Fragment는 Activity의 lifecycle과 다르게 Fragment의 lifecycle과 Fragment의 View의 lifecycle, 두 개가 있다.

lifecycleScope vs viewLifecycleOwner.lifecycleScope

1
2
3
4
5
6
7
8
9
10
11
12
13
class TestActivity : AppCompatActivity() {
override fun onCreate(savedInstanceState: Bundle?) {
super.onCreate(savedInstanceState)

lifecycleScope.launch { // Activity가 destroy될 때까지 살아있다.
repeatOnLifecycle(Lifecycle.State.STARTED) {
viewModel.inputEventSharedFlow.collect { event ->
// Activity가 STARTED 이상일 때만 실행된다.
}
}
}
}
}

생명주기:

1
2
3
4
5
onCreate() ──► lifecycleScope 시작

├─ coroutine 1 (collect)

onDestroy() ──► lifecycleScope 자동 취소

생명주기 (백스택 시나리오):

1
2
3
4
5
6
7
8
9
10
11
12
13
14
15
16
17
18
19
20
onCreateView() ──► View 생성

onViewCreated() ──► viewLifecycleOwner.lifecycleScope 시작
│ │
│ ├─ coroutine 1 (collect openEvent)
│ ├─ coroutine 2 (collect toastEvent)
│ └─ coroutine 3 (collect alertEvent)

[다른 Fragment로 이동]

onDestroyView() ──► View 파괴
viewLifecycleOwner.lifecycleScope내 모든 코루틴이 자동 취소된다.

(Fragment는 메모리(백스택)에 남아있는 상태)

[뒤로가기]

onCreateView() ──► View 다시 생성

onViewCreated() ──► 새로운 viewLifecycleOwner.lifecycleScope에서 새로운 코루틴들이 시작한다.

잘못 사용한 예

1
2
3
4
5
6
7
8
9
10
class MyFragment : Fragment() {
override fun onViewCreated(view: View, savedInstanceState: Bundle?) {
lifecycleScope.launch { // Fragment lifecycle
viewModel.events.collect {
// binding.textView 접근 → onDestroyView 후에도 실행됨!
binding.textView.text = "..." // 앱 크래시 가능성이 있다.
}
}
}
}
1
2
3
4
5
6
7
8
9
10
11
12
13
onCreateView() ──► View 생성

├─ lifecycleScope.launch (Fragment의 lifecycle)
│ └─ collect 시작

onDestroyView() ──► View 파괴 (binding.textView 사라짐)

│ (하지만 collect는 계속 실행 중인 상태)

└─ viewModel.events.emit() 발생
└─ binding.textView.text = "..." // 앱 크래시 가능성이 있다.

onDestroy() ──► 여기서야 lifecycleScope 내 코루틴들이 취소된다.

repeatOnLifecycle vs viewLifecycleOwner.repeatOnLifecycle

repeatOnLifecycleviewLifecycleOwner.repeatOnLifecycle도 동작 차이가 있다.

Fragment에서 사용했을 때 viewLifecycleOwner.lifecycleScope에서 launch하더라도 repeatOnLifecyclethis.repeatOnLifecycle이기 때문에 Fragment의 View 라이프사이클이 아닌 Fragment 라이프사이클을 따르기 때문에 메모리 누수 가능성이 있다.

따라서 아래와 같이 사용해야 한다.

1
2
3
4
5
6
7
8
9
10
11
class MyFragment : Fragment() {
override fun onViewCreated(view: View, savedInstanceState: Bundle?) {
viewLifecycleOwner.lifecycleScope.launch {
viewLifecycleOwner.repeatOnLifecycle(Lifecycle.State.STARTED) {
viewModel.events.collect {
binding.textView.text = "..."
}
}
}
}
}

[Android] Android 15 대응 - EdgeToEdge: 4. 디스플레이 컷아웃

컷아웃

⚠️ 픽셀 기기에서는 컷아웃이 제대로 넘어오지 않는 것 같음. 카메라가 있는데도 컷아웃이 0으로 내려옴.

Android 9 이상을 실행하는 기기에서는 일관성, 앱 호환성을 보장하기 위해 다음과 같은 컷아웃 동작을 보장해야 한다.

  • 단일 가장자리에 컷아웃을 최대 1개 포함할 수 있다.
  • 기기에 컷아웃이 3개 이상 있을 수 없다.
  • 기기 양 쪽의 긴 가장자리(세로 모드 시 좌우)에는 컷아웃이 있을 수 없다.
  • 특수 플래그를 설정하지 않은 세로 방향에서는 상태 표시줄이 적어도 컷아웃 높이까지 확장되어야 한다.
  • 기본적으로 전체 화면 또는 가로 방향에서는 전체 컷아웃 영역이 레터박스 처리되어야 한다.

따라서, 다음과 같은 컷아웃 유형을 지원한다.

  • 상단 중앙: 상단 가장자리 중앙의 컷아웃
  • 상단 비중앙: 컷아웃이 모서리에 위치하거나 중앙에서 약간 벗어날 수 있다.
  • 하단: 하단의 컷아웃
  • 이중: 상단의 컷아웃 1개, 하단의 컷아웃 1개

콘텐츠가 컷아웃 영역과 겹치지 않게 하려면 콘텐츠가 스테이터스 바 및 네비게이션 바와 겹치지 않게 하려면 컷아웃 영역에서 Inset을 부여하여 처리하면 해결이 가능하다.

컷아웃 영역으로 렌더링하는 경우 WindowInsets#getDisplayCutout() 함수를 사용하여 각 컷아웃의 Safe Inset Area와 Safe Area가 포함된 DisplayCutout 객체를 탐색할 수 있다. 따라서 이러한 API를 사용해 콘텐츠가 컷아웃과 겹치는지 여부를 판단하여 위치를 조정할 수 있다.

아래 세 가지 옵션은 Android 15(API 35)에서 deprecated된 View.SYSTEM_UI_FLAG_FULLSCREEN or View.SYSTEM_UI_FLAG_HIDE_NAVIGATION를 사용할 경우 유효한 옵션이다.

Android 15(API 35)부터는 WindowInsets#getDisplayCutout() 함수를 사용하면 된다.

컷아웃 영역은 카메라와 같은 하드웨어가 디스플레이를 가리는 경우 생긴다.
관련 예로, 폰에서 카메라 영역(컷아웃 영역) 때문에 상단 인셋을 적용했는데, 이 코드를 컷아웃 영역이 없는 태블릿에서 실행하니 컷아웃 영역이 없는데도 상단 인셋이 적용되어 버린다.
따라서 아래와 같이 컷아웃을 사용해 패딩을 설정하면 컷아웃에 따른 인셋을 설정할 수 있게 된다.

1
2
3
4
5
6
ViewCompat.setOnApplyWindowInsetsListener(findViewById(android.R.id.content)) { view, insets ->
insets.displayCutout?.let {
view.setPadding(0, it.safeInsetTop, 0, 0)
}
insets
}

[Android] Android 15 대응 - EdgeToEdge: 3. WindowInsetsController

WindowInsetsController

setSystemUiVisibility가 deprecated되어 Android 15(API 35)부터는 WindowInsetsController 인터페이스를 사용해야 한다.

1
2
3
4
5
6
7
8
9
10
11
12
13
14
15
16
17
18
19
20
21
22
23
24
25
26
27
28
29
30
31
/**
* Inset 생성 시 Window를 제어하기 위한 인터페이스
*/
public interface WindowInsetsController {

/**
* 어두운 백그라운드, 밝은 포그라운드 색상을 가진 불투명한 상태표시줄을 만듦
* @hide
*/
int APPEARANCE_OPAQUE_STATUS_BARS = 1;
/**
* 어두운 백그라운드, 밝은 포그라운드 색상을 가진 불투명한 네비게이션 바를 만듦
* @hide
*/
int APPEARANCE_OPAQUE_NAVIGATION_BARS = 1 << 1;
/**
* 상태바 레이아웃이 변경됨 없이 덜 두드러지게 상태표시줄의 아이템을 적용함
* @hide
*/
int APPEARANCE_LOW_PROFILE_BARS = 1 << 2;
/**
* 밝은 상태표시줄로 변경하여 상태바 내 아이템들의 시연성을 뚜렷하게 함
*/
int APPEARANCE_LIGHT_STATUS_BARS = 1 << 3;
/**
* 밝은 네비게이션 바로 변경하여 상태바 내 아이템들의 시연성을 뚜렷하게 함
*/
int APPEARANCE_LIGHT_NAVIGATION_BARS = 1 << 4;

...
}

여기의 플래그를 보면 기존에 제공하던 아래 플래그와 전혀 다른 것을 알 수 있다.

1
2
3
4
5
6
7
8
decorView.systemUiVisibility = 
// 아래 SYSTEM_UI_FLAG_LAYOUT_HIDE_NAVIGATION 와 중복?
View.SYSTEM_UI_FLAG_HIDE_NAVIGATION or
View.SYSTEM_UI_FLAG_FULLSCREEN or
// 가장 자리 스와이프 시 발동, 다만 앱에서는 인지 못함
View.SYSTEM_UI_FLAG_IMMERSIVE_STICKY or
// 하단 네비게이션 바 숨기기
View.SYSTEM_UI_FLAG_LAYOUT_HIDE_NAVIGATION

여러 SDK 버전을 커버하는 WindowCompat 클래스에는 다음과 같이 분기처리가 되어 있다.

1
2
3
4
5
6
7
8
9
// Window의 Inset을 적용하는 경우 //
public static void setDecorFitsSystemWindows(@NonNull Window window,
final boolean decorFitsSystemWindows) {
if (Build.VERSION.SDK_INT >= 30) {
Api30Impl.setDecorFitsSystemWindows(window, decorFitsSystemWindows);
} else {
Api16Impl.setDecorFitsSystemWindows(window, decorFitsSystemWindows);
}
}

1
2
3
4
5
6
7
8
9
10
11
12
13
14
15
16
static class Api16Impl {
private Api16Impl() {
// This class is not instantiable.
}
static void setDecorFitsSystemWindows(@NonNull Window window,
final boolean decorFitsSystemWindows) {
final int decorFitsFlags = View.SYSTEM_UI_FLAG_LAYOUT_STABLE
| View.SYSTEM_UI_FLAG_LAYOUT_HIDE_NAVIGATION
| View.SYSTEM_UI_FLAG_LAYOUT_FULLSCREEN;
final View decorView = window.getDecorView();
final int sysUiVis = decorView.getSystemUiVisibility();
decorView.setSystemUiVisibility(decorFitsSystemWindows
? sysUiVis & ~decorFitsFlags
: sysUiVis | decorFitsFlags);
}
}
1
2
3
4
5
6
7
8
9
10
11
@RequiresApi(30)
static class Api30Impl {
private Api30Impl() {
// This class is not instantiable.
}
@DoNotInline
static void setDecorFitsSystemWindows(@NonNull Window window,
final boolean decorFitsSystemWindows) {
window.setDecorFitsSystemWindows(decorFitsSystemWindows);
}
}

이와 같이 Android 15(API 35) 이상에서는 Window의 Inset을 부분적으로 적용하는 경우, Window#setDecorFitsSystemWindows를 사용하면 된다.

인셋의 종류는 다음 세 가지이다.

  • System bars insets
  • Display cutout insets
  • System gesture insets

SystemBar 숨김/표시

1
2
val windowInsetsController = WindowCompat.getInsetsController(window, window.decorView)
windowInsetsController.show(WindowInsets.Type.systemBars())

이를 사용해 시스템바를 표시하거나(show) 숨길(hide) 수 있다.

Window Inset 제어를 통한 FullScreen 구현

  • [AndroidDev] 몰입형 모드를 위한 시스템 표시줄 숨기기

기존에 decorView에 systemUiVisibility 옵션을 주었던 것과는 달리 안드로이드 11(API 30)에 대응하기 위해서는 InsetsController를 이용해야 한다.

Android 11에서 기존 옵션에 매칭되는 사항은 다음과 같다.

  • WindowInsetsController.BEHAVIOR_SHOW_BARS_BY_TOUCH: lean back
  • WindowInsetsController.BEHAVIOR_SHOW_BARS_BY_SWIPE: immersive
  • WindowInsetsController.BEHAVIOR_SHOW_TRANSIENT_BARS_BY_SWIPE: sticky immersive 최상단에서 쓸어내리거나 최하단에서 쓸어올리면 잠깐 나타나고 뷰에서 영역을 차지하지 않는다.

BEHAVIOR_SHOW_TRANSIENT_BARS_BY_SWIPE를 적용한 예시 코드는 다음과 같다.

1
2
3
4
WindowCompat.getInsetsController(this, this.decorView).apply {
hide(WindowInsetsCompat.Type.navigationBars())
systemBarsBehavior = WindowInsetsControllerCompat.BEHAVIOR_SHOW_TRANSIENT_BARS_BY_SWIPE
}

[Android] Android 15 대응 - EdgeToEdge: 2. StatusBar 및 NavigationBar

배경색

statusBar의 배경색을 지정할 수 있는 window.statusBarColor는 Android 15(API 35)에서 지원 종료되었다.

If the app targets VANILLA_ICE_CREAM or above, the color will be transparent and cannot be changed. - Window#setStatusBarColor 주석

VANILLA_ICE_CREAM 이상을 타겟팅한다면 색상은 투명이고 이 값을 사용할 수 없다고 가이드되어 있다.

따라서 status bar와 navigation bar 영역의 색상을 바꾸려면 setOnApplyWindowInsetsListener에 넘겨주는 findViewById(android.R.id.content)의 배경색을 바꿔야한다.

1
2
3
4
5
6
7
8
9
10
11
12
13
14
15
16
17
18
ViewCompat.setOnApplyWindowInsetsListener(
findViewById(android.R.id.content)
) { view, insets ->

val systemBars = insets.getInsets(WindowInsetsCompat.Type.systemBars())
view.setPadding(
systemBars.left,
systemBars.top,
systemBars.right,
systemBars.bottom
)

view.setBackgroundColor(
ContextCompat.getColor(view.context, R.color.white)
)

insets
}

이는 뷰의 배경색이기 때문에 padding을 설정해야 보이게 된다.

또한 status bar와 navigation bar의 색상을 다르게 하려면 아래 코드만으로는 안되고, 또 다른 조치를 취해줘야할 것으로 보인다.

statusBar는 위 코드와 같이 지정하고, navigationBar는 Activity의 최상위 뷰의 background에 컬러값 옵션과 paddingBottom을 설정함으로써 statusBar와 navigationBar의 색상을 다르게 처리하였다.

1
2
3
4
5
6
7
8
9
10
11
12
override fun onCreate(savedInstanceState: Bundle?) {
super.onCreate(savedInstanceState)
window.setupWindowInsetsClassroom()
ViewCompat.setOnApplyWindowInsetsListener(window.findViewById(android.R.id.content)) { view, insets ->
val systemBars = insets.getInsets(WindowInsetsCompat.Type.systemBars())
view.setBackgroundColor(ContextCompat.getColor(view.context, R.color.common_blue_color))
view.setPadding(0, systemBars.top, 0, 0)
binding.slidingPanelLayout.setPadding(0, 0, 0, systemBars.bottom)
insets
}
...
}

아이콘 색상

Android 15(API 35)에서는 다크모드에서의 흰색과 라이트 모드에서의 회색으로만 설정할 수 있다.

이를 설정하기 위해서는 아래 두 가지 setter를 사용한다.

  • InsetsController#isAppearanceLightStatusBars(boolean)
  • InsetsController#isAppearanceLightNavigationBars(boolean)
1
2
3
4
5
6
7
8
WindowCompat.getInsetsController(this, this.decorView).apply {
// 배경이 밝으니 스테이터스 바의 아이콘 색상을 회색으로 설정한다. //
isAppearanceLightStatusBars = true
// 배경이 밝으니 네비게이션 바의 아이콘 색상을 회색으로 설정한다. //
isAppearanceLightNavigationBars = true
// 3버튼 네비 바의 배경이 완전 투명 //
isNavigationBarContrastEnforced = false
}

InsetsController에 관해서는 아래에서 설명한다.

제스처 네비게이션 바

⚠️ 픽셀 기기에서는 제스처 네비게이션 바의 색상이 제제대로 처리되지 않는 것 같음. 흰배경이 뒤에 있는데도 흰색으로 설정되어있음.

제스처 네비게이션의 바 색상은 흰색↔회색으로 변하는데, 이는 아래 인용과 같이 시스템에서 알아서 변경해준다.

동작 탐색 모드: 시스템은 시스템 표시줄의 콘텐츠가 뒤에 있는 콘텐츠를 기반으로 색상을 변경하는 동적 색상 조정을 적용한다. (시스템 표시줄 색상 변경하기 영상 참고)

[Android] Android 15 대응 - EdgeToEdge: 1. Inset 적용

TL; DR

1
2
3
4
5
6
7
8
9
10
11
12
13
14
15
16
17
18
19
20
21
22
23
24
25
26
27
28
29
30
31
32
33
34
35
36
37
38
39
40
41
42
43
44
45
46
47
48
import android.view.View
import android.view.Window
import androidx.core.view.ViewCompat
import androidx.core.view.WindowCompat
import androidx.core.view.WindowInsetsCompat

/**
* EdgeToEdge(API 30부터 지원) 적용에 따른 인셋을 적용한다.
*/
fun Window.setupWindowInsets() {
WindowCompat.getInsetsController(this, this.decorView).apply {
isAppearanceLightStatusBars = true
isAppearanceLightNavigationBars = true
}

ViewCompat.setOnApplyWindowInsetsListener(findViewById(android.R.id.content)) { view, insets ->
val systemBars = insets.getInsets(WindowInsetsCompat.Type.systemBars())
view.setPadding(systemBars.left, systemBars.top, systemBars.right, systemBars.bottom)
insets
}
}

/**
* EdgeToEdge(API 30부터 지원) 적용에 따른 인셋을 적용한다.
* 추가로, 키보드가 올라올 때 (IME 인셋이 있을 때) 버튼을 이동시킨다.
* @param viewForKeyboard 키보드가 올라올 때 이동시킬 View
*/
fun Window.setupWindowInsetsKeyboard(viewForKeyboard: View) {
WindowCompat.getInsetsController(this, this.decorView).apply {
isAppearanceLightStatusBars = false
isAppearanceLightNavigationBars = true
}

ViewCompat.setOnApplyWindowInsetsListener(findViewById(android.R.id.content)) { view, insets ->
val systemBars = insets.getInsets(WindowInsetsCompat.Type.systemBars())
val imeInsets = insets.getInsets(WindowInsetsCompat.Type.ime())

// 키보드가 올라올 때 (IME 인셋이 있을 때) 버튼을 이동
viewForKeyboard.translationY = if (imeInsets.bottom > 0) {
-(imeInsets.bottom - systemBars.bottom).toFloat()
} else {
0f
}

view.setPadding(systemBars.left, systemBars.top, systemBars.right, systemBars.bottom)
insets
}
}

EdgeToEdge 적용

1
2
3
4
5
6
7
8
9
10
11
12
13
14
15
16
17
18
class MainActivity : ComponentActivitiy() {

private fun setupWindowInsets() {
ViewCompat.setOnApplyWindowInsetsListener(findViewById(android.R.id.content)) { view, insets ->
val systemBars = insets.getInsets(WindowInsetsCompat.Type.systemBars())
view.setPadding(systemBars.left, systemBars.top, systemBars.right, systemBars.bottom)
insets
}
}

override fun onCreate(savedInstanceState: Bundle?) {
enableEdgeToEdge() // 반드시 onCreate보다 먼저 호출해야 한다.
super.onCreate(savedInstanceState)
setupWindowInsets()
...
}
...
}

setDecorFitsSystemWindows

WindowInsetsCompat에 따라 decorView가 루트 수준 콘텐츠 뷰에 맞출 것인지 여부를 설정한다.

false로 설정하면 프레임워크는 콘텐츠 뷰를 인셋에 맞추지 않고 WindowInsetsCompat을 통해 콘텐츠 뷰에 전달한다.

API 35 미만에서는 시스템 바까지 확장된 풀스크린(edgeToEdge)이 decorFitsSystemWindows 옵션을 통해 선택적이었다.

decorFitsSystemWindows는 내부적으로 API 16-29에서 setSystemUiVisibility를 사용한다.

1
2
3
4
5
6
7
8
9
10
11
12
13
14
15
16
17
18
19
20
static class Api16Impl {

private Api16Impl() {
// This class is not instantiable.
}

static void setDecorFitsSystemWindows(
@NonNull Window window,
final boolean decorFitsSystemWindows
) {
final int decorFitsFlags = View.SYSTEM_UI_FLAG_LAYOUT_STABLE
| View.SYSTEM_UI_FLAG_LAYOUT_HIDE_NAVIGATION
| View.SYSTEM_UI_FLAG_LAYOUT_FULLSCREEN;
final View decorView = window.getDecorView();
final int sysUiVis = decorView.getSystemUiVisibility();
decorView.setSystemUiVisibility(decorFitsSystemWindows
? sysUiVis & ~decorFitsFlags
: sysUiVis | decorFitsFlags);
}
}

WindowCompat.setDecorFitsSystemWindows(window, boolean)은 API에 맞는 동작으로 하도록 구성되어, API 30 이상과 API 16-29가 분기처리되어 있다.

1
2
3
4
5
6
7
8
public static void setDecorFitsSystemWindows(@NonNull Window window,
final boolean decorFitsSystemWindows) {
if (Build.VERSION.SDK_INT >= 30) {
Api30Impl.setDecorFitsSystemWindows(window, decorFitsSystemWindows);
} else {
Api16Impl.setDecorFitsSystemWindows(window, decorFitsSystemWindows);
}
}

그런데, API 35에서 이를 아우를 수 있는, 즉 decorFitsSystemWindows나 setSystemUiVisibility를 개발자가 사용하지 않고 enableEdgeToEdge() 함수 호출만으로 풀스크린을 구현할 수 있게 되었다.

문제는 그것 뿐만이 아니라 풀스크린이 기본 기기 설정이 된 것이다. enableEdgeToEdge()를 설정하지 않아도 targetSDK가 35인 앱은 풀스크린으로 실행된다. 따라서 그 기본 설정을 위해 enableEdgeToEdge()를 호출해줘야 하는 것이다.

enableEdgeToEdge()를 사용하기 이전에는 decorFitsSystemWindows를 사용하여 시스템 표시줄 뒤에 앱을 배치하였다.

1
2
3
4
override fun onCreate(savedInstanceState: Bundle?) {
super.onCreate(savedInstanceState)
WindowCompat.setDecorFitsSystemWindows(window, false)
}
1
2
3
<RelativeLayout
...
android:fitsSystemWindows="true">

그런데 enableEdgeToEdge()의 내부 코드를 보면 내부적으로 모두 setDecorFitsSystemWindows(window, false)를 호출하고 있음을 볼 수 있다.

1
2
3
4
5
6
7
8
9
10
11
12
13
14
15
16
17
18
19
20
21
22
23
24
25
26
27
28
29
30
31
32
33
34
35
36
37
38
39
40
41
42
43
44
45
46
47
48
49
50
51
52
53
54
55
56
57
58
59
60
61
@JvmName("enable")
@JvmOverloads
fun ComponentActivity.enableEdgeToEdge(
statusBarStyle: SystemBarStyle = SystemBarStyle.auto(Color.TRANSPARENT, Color.TRANSPARENT),
navigationBarStyle: SystemBarStyle = SystemBarStyle.auto(DefaultLightScrim, DefaultDarkScrim)
) {
val view = window.decorView
val statusBarIsDark = statusBarStyle.detectDarkMode(view.resources)
val navigationBarIsDark = navigationBarStyle.detectDarkMode(view.resources)
val impl = Impl ?: if (Build.VERSION.SDK_INT >= 29) {
EdgeToEdgeApi29()
} else if (Build.VERSION.SDK_INT >= 26) {
EdgeToEdgeApi26()
} else if (Build.VERSION.SDK_INT >= 23) {
EdgeToEdgeApi23()
} else if (Build.VERSION.SDK_INT >= 21) {
EdgeToEdgeApi21()
} else {
EdgeToEdgeBase()
}.also { Impl = it }
impl.setUp(
statusBarStyle, navigationBarStyle, window, view, statusBarIsDark, navigationBarIsDark
)
}

@RequiresApi(21)
private class EdgeToEdgeApi21 : EdgeToEdgeImpl {
@Suppress("DEPRECATION")
@DoNotInline
override fun setUp(...) {
WindowCompat.setDecorFitsSystemWindows(window, false)
...
}
}

@RequiresApi(23)
private class EdgeToEdgeApi23 : EdgeToEdgeImpl {
@DoNotInline
override fun setUp(...) {
WindowCompat.setDecorFitsSystemWindows(window, false)
...
}
}

@RequiresApi(26)
private class EdgeToEdgeApi26 : EdgeToEdgeImpl {
@DoNotInline
override fun setUp(...) {
WindowCompat.setDecorFitsSystemWindows(window, false)
...
}
}

@RequiresApi(29)
private class EdgeToEdgeApi29 : EdgeToEdgeImpl {
@DoNotInline
override fun setUp(...) {
WindowCompat.setDecorFitsSystemWindows(window, false)
...
}
}

링크 Scrim은 연극 용어이다. 앞쪽에 빛을 비추면 불투명하고, 뒤쪽에 빛을 비추면 투명하거나 반투명하게 보이는 theater drop을 의미한다.

키보드가 나타났을 때의 인셋 대응 - adjustResize

1
2
3
4
5
6
7
8
9
10
11
12
13
14
15
16
17
18
19
20
21
/**
* EdgeToEdge(API 30부터 지원) 적용에 따른 인셋을 적용한다.
* 추가로, 키보드가 올라올 때 (IME 인셋이 있을 때) 버튼을 이동시킨다.
* @param viewForKeyboard 키보드가 올라올 때 이동시킬 View
*/
fun Window.setupWindowInsetsKeyboard(viewForKeyboard: View) {
ViewCompat.setOnApplyWindowInsetsListener(findViewById(android.R.id.content)) { view, insets ->
val systemBars = insets.getInsets(WindowInsetsCompat.Type.systemBars())
val imeInsets = insets.getInsets(WindowInsetsCompat.Type.ime())

// 키보드가 올라올 때 (IME 인셋이 있을 때) 버튼을 이동
viewForKeyboard.translationY = if (imeInsets.bottom > 0) {
-(imeInsets.bottom - systemBars.bottom).toFloat()
} else {
0f
}

view.setPadding(systemBars.left, systemBars.top, systemBars.right, systemBars.bottom)
insets
}
}

[Android/Flow] LiveData가 아닌 Flow를 사용해야 하는 이유

예전에는,

  • LiveData는 생명주기에 종속적이었고, 메인 스레드에서 실행되었기 때문에 Repository에서 사용하기엔 알맞지 않았다.
  • 반면 Flow는 생명주기를 인식할 수 없었으나 데이터 스트림을 관리하는 객체로서 확장 함수가 잘 구성되어있었고, 코틀린 코루틴 라이브러리의 일부이기 때문에 Repository에서 사용하더라도 클린 아키텍처에 반하지 않았다.
    • Flow는 coroutine 라이브러리에 포함되어있기 때문에 Repository에서 사용 시 의존성을 추가하지 않아도 된다.
      1
      2
      import kotlinx.coroutines.flow.MutableSharedFlow
      import kotlinx.coroutines.flow.asSharedFlow
    또한,

    Flow는 Cold Stream 방식이다. 연속해서 계속 들어오는 데이터를 처리할 수 없고, collect 되었을 때만 생성되고 값을 반환한다. 만약 하나의 Flow Builder에 대해 다수의 collector가 있다면 collector 하나마다 하나씩 데이터를 호출하기 대문에 비용이 비싼 DB 접근, 서버 통신 등을 수행한다면 여러 번 리소스 요청을 하게될 수 있다.

→ LiveData는 ViewModel, Flow는 Repository에서 사용하는 상호보완적 관계였다.

  • 그런데 repeatOnLifecycle 블록에서 데이터를 collect함으로써 생명주기를 인식할 수 있는 StateFlow/SharedFlow가 등장했다.
    • LiveData와 Flow는 ViewModel단에서는 상호대체 가능해졌다.
    → 하지만 Flow가 사용성이 더 높기 때문에(ViewModel과 Repository 두 영역에서 모두 사용할 수 있게 되었기 때문에) LiveData보다는 Flow를 더 선호하게 되었다.
  • StateFlow

    StateFlow는 현재 상태와 새로운 상태 업데이트를 수집기에 내보내는 관찰 가능한 상태 홀더 흐름이다. value 속성을 통해서도 현재 상태 값을 읽을 수 있다. 상태를 업데이트하고 Flow에 전송하려면 MutableStateFlow 클래스의 value 속성에 새 값을 할당한다.

    StateFlow는 Hot Flow이다. Flow에서 수집해도 생산자 코드가 트리거되지 않는다.

    즉, StateFlow는 Hot 스트림 방식으로, 소비자의 collect 요청이 없어도 바로 값을 내보내고, 데이터가 업데이트 될 떄마다 데이터를 발행한다.

[Android] 쿠키에 관하여

쿠키

여기서는 앱에 내려주는 쿠키형식에 관하여 이야기한다.

  • [MDN] Set-Cookie

1. 세션 쿠키

1
Set-Cookie: sessionId=38afes7a8

가장 간단한 형재는 key=value 형태로 되어있다.

Expires 속성 설명에 나와있듯이,

If unspecified, the cookie becomes a session cookie. A session finishes when the client shuts down, after which the session cookie is removed.

Expires 속성값이 지정되지 않으면 세션 쿠키이고, Chrome Inspector의 쿠키 리스트 중 expires 값에 “session”이라고 나타난다.

2. 지속(persistent) 쿠키

1
Set-Cookie: id=a3fWa; Expires=Wed, 21 Oct 2015 07:28:00 GMT

지속 쿠키는 Expires 값이 HTTP Date 형태로 지정된 값이다. 이는 GMT(그리니치 평균시)를 따르며 런던을 기점으로 하는 시각이고, 로컬 시각이 아니다.

⚠️ 한국의 경우 GMT+09:00으로 표현하나, Expires 속성값 마지막에 “GMT” 대신 “GMT+09:00”를 쓰더라도 “+09:00”는 무시되기 때문에 날짜는 항상 “GMT” 시간을 나타내는 점에 주의해야 한다.

이렇게 Expires 속성값이 지정된 쿠키는 지정된 만료 일자까지 살아있는다.

3. 안드로이드 웹뷰에도 세션 쿠키와 지속 쿠키가 나뉘어져서 보관되는가?

결론만 말하면, 그렇다.

이는 CookieManager의 removeSessionCookies()와 removeAllCookies() 메소드로 확인할 수 있다.

  1. 우선 expires 속성값이 내려오는 “test” 쿠키가 있다고 하자.
    1
    Set-Cookie: test=1; Expires=Thu, 20 Mar 2025 11:13:47 GMT+09:00; Domain=.megastudy.net; Path=/;
  2. 이를 앱에서 받아(받는 방법은 아래의 [okhttp3.CookieJar] 항목을 참조) cookieManager를 이용해 setCookie한다.
  3. removeSessionCookies()와 removeAllCookies()를 각각 수행하고 쿠키가 삭제되는지 확인한다.

그 결과는 다음과 같다.

expires 속성 없음 expires 속성 있음
removeSessionCookies 삭제됨 삭제안됨
removeAllCookies 삭제됨 삭제됨

여기서 removeSessionCookie로 삭제되지 않는 값, 즉 expires 속성이 있는 쿠키값은 지속 쿠키로 간주할 수 있겠다.

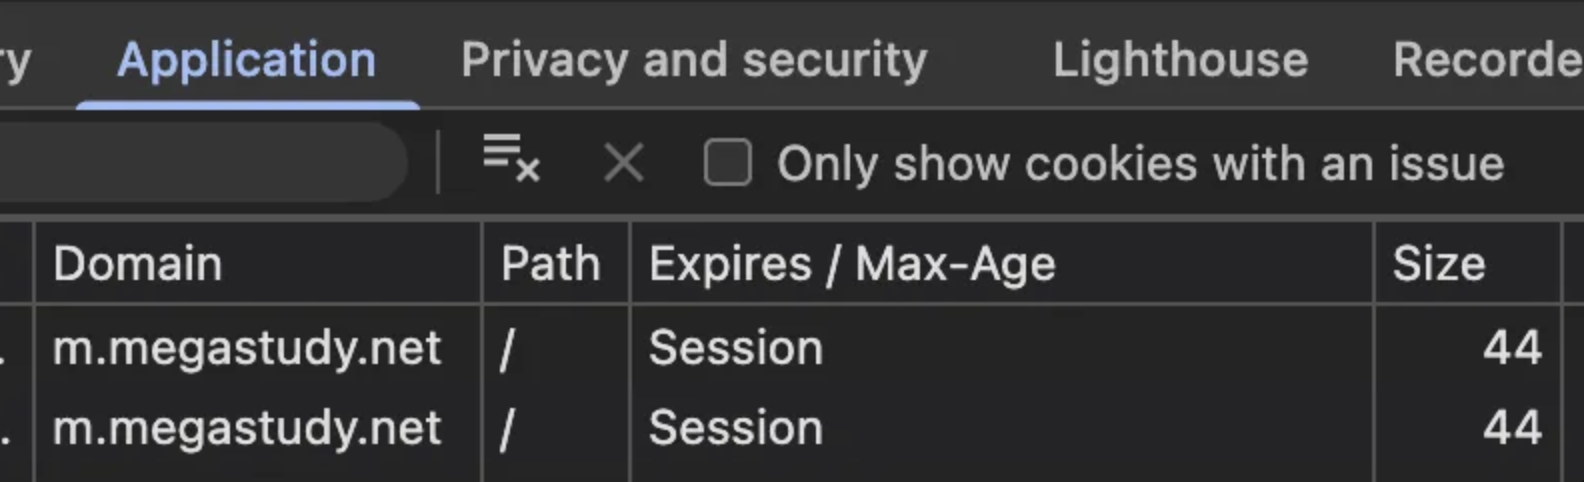
CookieManager의 getCookie를 통해서는 쿠키의 이름과 값만 내려온다. 따라서 CookieManager를 통해 해당 쿠키의 만료일자 또는 만료여부를 판단할 수 있는 deprecated되지 않은 메소드는 없다.(CookieManager#removeExpiredCookie()는 deprecated되었다.) 그러나 앱 내부적으로 쿠키DB에 저장은 되고 있음을 inspector의 [Application] 탭 > 사이드바의 [Storage] > [Cookies] > [해당 도메인]으로 접근하여 expires 값이 세팅되어있음을 확인할 수 있다.

okhttp3.CookieJar

1
2
3
4
5
6
7
8
9
10
11
12
13
14
15
16
17
18
19
20
val cookieManager = CookieManager.getInstance()

private val myCookieJar = object : CookieJar {
override fun loadForRequest(url: HttpUrl): MutableList<Cookie> {
val cookies = mutableListOf<Cookie>()

// 여기서 앱에서 가지고 있는 쿠키를 웹으로 보낼 수 있다.

return cookies
}

override fun saveFromResponse(url: HttpUrl, cookies: MutableList<Cookie>) {
// 여기서 파라미터를 통해 받아온 cookies 값은 웹에서 세팅된 쿠키값이며
// 이를 안드로이드에 setCookie 해주어야 한다.

cookies.forEachIndexed { i, cookie ->
cookieManager.setCookie(url.toString(), cookie.toString())
}
}
}

CookieJar은 loadForRequest와 saveFromResponse 두 개의 함수를 구현하도록 되어 있다.

  • loadForRequest: HTTP 요청을 보내 기 전에 요청에 사용할 쿠키를 반환한다.
  • saveFromResponse: HTTP 응답으로부터 받은 쿠키를 저장소에 저장한다.

따라서 순서로 따지면 loadForRequest 후에 saveFromReponse가 호출된다.

이를 적용하는 코드는 다음과 같다.

1
2
3
4
5
6
private val clientBuilder = OkHttpClient.Builder().apply {
connectTimeout(Const.TIMEOUT, TimeUnit.SECONDS)
writeTimeout(Const.TIMEOUT, TimeUnit.SECONDS)
readTimeout(Const.TIMEOUT, TimeUnit.SECONDS)
}
.cookieJar(myCookieJar)

[Web/Attribute] Expires

Expires 속성을 가진 지속 쿠키를 웹으로부터 받아온 경우(CookieJar의 saveFromResponse로 확인) 이 만료 기간이 잘 작동하는지 확인하고자 하였다.

우선 아래와 같이 test 라는 이름의 쿠키를 추가한다.

1
2
3
4
5
6
7
8
9
10
11
val time = SimpleDateFormat("EEE, dd MMM yyyy HH:mm:ss z", Locale.US)
time.timeZone = TimeZone.getTimeZone("GMT")
val expiryDate = time.format(
Date(System.currentTimeMillis() + 60 * 1000)
)
cookieManager.setCookie(
url.toString(),
"test=1; Expires=$expiryDate;Domain=.megastudy.net; Path=/;"
);

// "test=1; Expires=Thu, 20 Mar 2025 11:13:47 GMT+09:00;Domain=.megastudy.net; Path=/;"

Expires 속성값은 HTTP Date 형식으로 되어, GMT(그리니치 표준시)를 따른다. 이를 위해 타임존을 설정하면 로컬(한국)의 시간보다 9시간차이가 나는 값을 얻을 수 있다. 즉 아래 두 값은 같은 시각을 나타낸다고 보면 된다.

  1. Thu, 20 Mar 2025 15:00:00 GMT+09:00
  2. Thu, 20 Mar 2025 06:00:00 GMT

그리고 Expires 속성값은 1번을 넣어도 2번으로 인식하는 게 아니기 때문에 반드시 로컬 시간을 보정해주어야 하며 이를 위해 timeZone을 TimeZone.getTimeZone("GMT")로 설정한다.

chrome inspector

그리고 해당 “test” 쿠키는 GMT 값에 따라 만료일이 경과하면 자동으로 사라지는 것을 inspector를 통해 확인할 수 있다.

[Android] LifecycleOwnerWrapper 분석

앱이 포그라운드에서 백그라운드로 전환됐을 때 해당 Activity가 onPause에서 onStop으로 전환된다. 이때 ViewModel의 LiveData가 변경을 감지하고자 등록된 (Activity 또는 Fragment로부터 받은) lifecycleOwner는 활성화(active) 상태에서 비활성화(inActive) 상태로 전환된다.

이때 onStop(inActive 상태) 시에도 활성화 상태를 유지하기 위해 구현된 LifecycleOwnerWrapper 상세는 다음과 같다.

1
2
3
4
5
6
7
8
9
10
11
12
13
14
15
16
17
18
19
20
21
22
23
24
25
26
27
28
29
30
class LifecycleOwnerWrapper(
sourceOwner: LifecycleOwner
): LifecycleOwner, LifecycleEventObserver {

override val lifecycle = LifecycleRegistry(this)

init {
sourceOwner.lifecycle.addObserver(this)

when (val state = sourceOwner.lifecycle.currentState) {
Lifecycle.State.DESTROYED -> lifecycle.handleLifecycleEvent(Lifecycle.Event.ON_DESTROY)
Lifecycle.State.CREATED -> lifecycle.handleLifecycleEvent(Lifecycle.Event.ON_CREATE)
Lifecycle.State.STARTED -> lifecycle.handleLifecycleEvent(Lifecycle.Event.ON_START)
Lifecycle.State.RESUMED -> lifecycle.handleLifecycleEvent(Lifecycle.Event.ON_RESUME)
else -> {
// do nothing, the observer will catch up
}
}
}

override fun onStateChanged(
source: LifecycleOwner,
event: Lifecycle.Event
) {
if (event != Lifecycle.Event.ON_PAUSE
&& event != Lifecycle.Event.ON_STOP) {
lifecycle.handleLifecycleEvent(event)
}
}
}

  1. “onStop(inactive 상태) 시에도 활성화 상태를 유지하”는 lifecycle을 새롭게 만들기 위해 LifecycleOwner를 상속받아 lifecycle 변수를 새로 정의한다.

    1
    2
    3
    4
    class LifecycleOwnerWrapper(sourceOwner: LifecycleOwner): LifecycleOwner, LifecycleEventObserver {
    override val lifecycle = LifecycleRegistry(this)
    ...
    }
  2. 그 lifecycle이 생성되었을 때 현재 state를 init을 통해 등록한다.

    1
    2
    3
    4
    5
    6
    7
    8
    9
    10
    init {
    ...
    when (val state = sourceOwner.lifecycle.currentState) {
    Lifecycle.State.DESTROYED -> lifecycle.handleLifecycleEvent(Lifecycle.Event.ON_DESTROY)
    Lifecycle.State.CREATED -> lifecycle.handleLifecycleEvent(Lifecycle.Event.ON_CREATE)
    Lifecycle.State.STARTED -> lifecycle.handleLifecycleEvent(Lifecycle.Event.ON_START)
    Lifecycle.State.RESUMED -> lifecycle.handleLifecycleEvent(Lifecycle.Event.ON_RESUME)
    else -> {}
    }
    }

    여기서 handleLifecycleEvent는 아래 구현부와 같이 파라미터로 받은 state를 currentState로 등록하는 역할을 한다.

    1
    2
    3
    4
    5
    6
    7
    8
    9
    10
    11
    12
    13
    14
    15
    16
    17
    18
    19
    20
    21
    22
    23
    24
    25
    26
    27
    28
    /**
    * Sets the current state and notifies the observers.
    */
    open fun handleLifecycleEvent(event: Event) {
    enforceMainThreadIfNeeded("handleLifecycleEvent")
    moveToState(event.targetState)
    }

    private fun moveToState(next: State) {
    if (state == next) {
    return
    }
    check(!(state == State.INITIALIZED && next == State.DESTROYED)) {
    "no event down from $state in component ${lifecycleOwner.get()}"
    }
    state = next
    if (handlingEvent || addingObserverCounter != 0) {
    newEventOccurred = true
    // we will figure out what to do on upper level.
    return
    }
    handlingEvent = true
    sync()
    handlingEvent = false
    if (state == State.DESTROYED) {
    observerMap = FastSafeIterableMap()
    }
    }
  3. 새로운 lifecycle에 대한 동작을 구현하기 위해 LifecycleEventObserver를 상속받도록 하여 onStateChanged를 구현할 수 있도록 한다.

    1
    2
    3
    4
    5
    6
    7
    8
    9
    class LifecycleOwnerWrapper(
    sourceOwner: LifecycleOwner
    ): LifecycleOwner, LifecycleEventObserver {
    ...
    override fun onStateChanged(
    source: LifecycleOwner,
    event: Lifecycle.Event
    ) {}
    }
    • 여기서 LifecycleEventObserver를 상속받지 않고 LifecycleOwnerWrapper를 사용하는 Activity 또는 Fragment 내의 observer를 등록하는 부분에서 LifecycleEventObserver를 구현해도 된다.
  4. onStateChanged에는 “onStop(inactive 상태) 시에도 활성화 상태를 유지하”기 위해 onStop일 경우 정상적으로 handleLifecycleEvent를 호출하지 않도록 한다.

    1
    2
    3
    4
    5
    6
    7
    8
    9
    override fun onStateChanged(
    source: LifecycleOwner,
    event: Lifecycle.Event
    ) {
    if (event != Lifecycle.Event.ON_PAUSE
    && event != Lifecycle.Event.ON_STOP) {
    lifecycle.handleLifecycleEvent(event)
    }
    }

    그럼으로써 이 lifecycle에서는 다음과 같은 커스텀 lifecycle이 적용된다.

    정상 lifecycle 활성화 여부 커스텀 lifecycle에서의 state 활성화 여부
    onCreate x ON_CREATE x
    onStart o ON_START o
    onResume o ON_RESUME o
    onPause o* ON_RESUME o
    onStop x ON_RESUME o
    onDestroy x ON_DESTROY x
    *링크에 따르면, Fragment에서는 onPause에서도 active하다고 함.
  5. 마지막으로 구현된 새로운 lifecycle을 적용하기 위해 sourceOwner에 LifecycleEventObserver를 등록(addObserver)한다.

    1
    sourceOwner.lifecycle.addObserver(this)

[Coil/번역] 2.3.0

📌 implementation 'io.coil-kt:coil-compose:2.3.0’

인트로

SubcomposeAsyncImage을 다음과 같이 사용했을 때 LazyColumn 동작에서 버벅이는 이슈가 있었다.

1
2
3
4
5
6
7
8
9
10
11
12
13
14
15
16
17
SubcomposeAsyncImage(
model = imageUrl,
imageLoader = CoilImageLoader.getImageLoader(context = context),
error = {
Image(
modifier = Modifier.size(50.dp),
painter = painterResource(id = R.drawable.none),
contentDescription = ""
)
},
contentDescription = "",
modifier = Modifier
.size(50.dp)
.clip(CircleShape)
.zIndex(1f),
contentScale = ContentScale.Crop
)
1
2
3
4
5
6
7
8
9
10
11
12
13
object CoilImageLoader {
@Composable
fun getImageLoader(context: Context): ImageLoader {
val imageLoader = remember {
ImageLoader.Builder(context)
.memoryCache { MemoryCache.Builder(context).maxSizePercent(0.3).build() }
.crossfade(true)
.allowHardware(false)
.build()
}
return imageLoader
}
}

테스트 해보니, Coil에서는 url에 빈값이 들어올 경우 error로 넘어간다.(Glide는 빈값일 경우 네트워크를 통하지 않고 바로 placeholder를 그대로 보여준다) 그래서 스크롤 할 때마다 로딩이미지도 깜빡거리면서 다시 그려지는 모션을 보이게 되었다.

여기서 문제는 Subcomposition이었다.

1
2
3
4
5
6
7
8
9
10
11
12
AsyncImage(
model = memberImage,
contentDescription = stringResource(id = R.string.description_profile_image),
imageLoader = CoilImageLoader.getImageLoader(context = context),
modifier = Modifier
.size(50.dp)
.clip(CircleShape)
.zIndex(1f),
placeholder = painterResource(id = R.drawable.none_profile_02),
error = painterResource(id = R.drawable.none_profile_02),
contentScale = ContentScale.Crop,
)

평범하게 AsyncImage를 사용하여 어느정도 예상대로의 움직임을 보이도록 성공했다.

📌 이하는 Coil 공식 문서를 번역한 것입니다.

AsyncImage 컴포저블을 사용하는 예시는 다음과 같다.

1
2
3
4
AsyncImage(
model = "https://example.com/iamge.jpg",
contentDescription = null
)

model은 ImageRequest.data 값이나 ImageRequest 그 자체를 넘길 수 있다.

AsyncImage

AsyncImage는 비동기적으로 image를 요청하여 결과값을 렌더링하는 컴포저블이다. 이는 Image 컴포저블의 표준 매개변수를 동일하게 지원하고, 부가적으로 placeholder, error, fallback painters와 onLoading, onSuccess, onError 콜백을 추가 지원한다.

1
2
3
4
5
6
7
8
9
10
AsyncImage(
model = ImageRequest.Builder(LocalContext.current)
.data("https://example.com/image.jpg")
.crossfade(true)
.build(),
placeholder = painterResource(R.drawable.placeholder),
contentDescription = stringResource(R.string.description),
contentScale = ContentScale.Crop,
modifier = Modifier.clip(CircleShape)
)

SubcomposeAsyncImage

SubcomposeAsyncImage는 AsyncImage의 변형이다. 이것은 Painter를 사용하는 대신 AsyncImagePainter의 상태를 API 슬롯(아래 예제에서 loading 와 같은 것)에 제공하는 subcomposition을 사용하는 데에 쓰인다. 그 예제는 다음과 같다.

1
2
3
4
5
6
7
SubcomposeAsyncImage(
model = "https://example.com/image.jpg",
loading = {
CircularProgressIndicator() // subcomposition?
},
contentDescription = straintResource(R.string.description)
)

거기에 더해, 현재 상태에 따라 렌더링하는 항목이 달라지도록 복잡한 로직을 만들 수도 있다.

1
2
3
4
5
6
7
8
9
10
11
12
SubcomposeAsyncImage(
model = "https://example.com/image.jpg",
contentDescription = stringResource(R.string.description)
) {
val state = painter.state
if (state is AsyncImagePainter.State.Loading
|| state is AsyncImagePainter.State.Error) {
CirclularProgressIndicator()
} else {
SubcomposeAsyncImageContent()
}
}

Subcomposition은 정규 composition보다 효율이 낮다. 그래서 이 컴포저블은 높은 퍼포먼스(부드러운 스크롤 동작 등)를 요구하는 UI에서는 맞지 않을 수 있다.

If you set a custom size for the ImageRequest using ImageRequest.Builder.size (e.g. size(Size.ORIGINAL)), SubcomposeAsyncImage will not use subcomposition since it doesn’t need to resolve the composable’s constraints.

ImageRequest.Builder.size 를 사용하여 ImageRequest의 맞춤 크기를 설정하면 SubcomposeAsyncImage는 컴포저블의 제약 조건을 해결할 필요가 없으므로 하위 컴포지션을 사용하지 않습니다.

AsyncImagePainter

내부적으로 AsyncImage와 SubcomposeAsyncImage는 model을 로드할 때 AsyncImagePainter를 사용한다. 만약 Painter가 필요한데 AsyncImage를 사용할 수 없다면 rememberAsyncImagePainter를 사용할 수 있을 것이다.

1
val painter = rememberAsyncImagePainter("https://example.com/image.jpg")

단, rememberAsyncImagePainter는 모든 경우에서 예상대로 동작하지 않을 수 있는 하위 수준 API다.

만약 AsyncImagePainter를 렌더링하는 Image 컴포저블에 커스텀 ContentScale를 적용한다면 rememberAsyncImagePainter도 함께 세팅해야 한다. 이건 로드할 이미지의 크기를 결정하는 데에 필수적이기 때문이다.